Sisters with Flair

Showing posts with label Tutorial. Show all posts

Monday, March 28, 2011

Easiest magnet board ever....

You know how some bloggers out there totally make it sound like refinishing an armoire was a 3 hour project? Or reupholstering a chair could be done during the baby's nap time? Of course while doing these massive projects, somehow they (other bloggers) appear to have perfectly dressed children, immaculate homes and gourmet meals on the table every night. So you think to yourself, "heck, I could paint may kitchen cabinets." But when you try to accomplish it yourself you run into massive problems. So then you spend 5 days (more like 2 weeks in my case) trying to fix all the things that went wrong, spend more money buying more products to repair the damage that you may or may not have caused in your little "freak out tantrum" (that you may or may not have had). And when it's all said and done, you have finished a very large plate of brownies by yourself (I would never do such a thing) just to make yourself feel a little better, for a project that you, in the end, wish you had never started and don't really care for the finished product either! Just so you know, I'm not that nice of a blogger. I can't really sugar coat all the problems I have when starting a huge DIY project, I just sugar coat myself in chocolate as a reward afterward! So when I say this was the EASIEST PROJECT EVER, I mean it. Here are the supplies I started with: Mod podge & foam brush, heavier scrapbook paper & metal sign. (mine was from Hobby Lobby found in the garden section) First cut the paper to the size of the metal sign. Next, place a thin layer of mod podge on the metal and a small coat as well on the paper. Lay the paper down and smooth out the wrinkles. Make sure the edges have been glued down securely. Let it dry completely. Add a layer of mod podge to the top after it's dry for extra protection. I made easy magnets from stickers from K&Co and small magnets I already had. The stickers are self adhesive so no additional glue is necessary, but I added a little bit of hot glue just for added durability. Add ribbon (or pom poms in my case) if you want to embellish your sign and hang it! I hung this on the outside of my daughter's room so I could place personal messages to her. She loves it!
This would also be a really inexpensive birthday gift for a child's party. The metal sign was only $2.99 at Hobby Lobby so the whole project under $5. Match their room colors, add a photo or a birthday card and you just won yourself Cutest Gift award!

Saturday, July 10, 2010

Pillow love

Sigh- Don't you just love pretty pillows? They make such a bold statement to a couch or bed. I love how much they can change the feel of a room or add a pop of color. I have tons of pillows to recover and its been awhile since I've made some. These pillows were easy to make thanks to my sister Mandy's tutorial found here. Before I sewed the back flaps of the pillow to the front I decided to make some fun designs. I've been inspired lately by funky t-shirts from Anthropologie & J-Crew. I love the tone on tone look as well. Subtle but with a touch of flair! Here's the two pillows that I came up with today.


This is supposed to be random leaves falling. I pinned them where I wanted them and then sewed them using the sewing machine. Once I had the front of the pillow the way I wanted it, I sewed the back flaps of the pillow on.


This next pillow is a polka dot/ primitive flower look. I chose to hand sew these polka dots on instead of using the sewing machine.


My kitchen which is adjacent to this room is painted a faux dark orange. So I chose to bring some of the orange into this space as well.


The best thing about recovering these pillows was the cost. Free! I used fabric that was left over from my dining room drapes. If I decide to change the color scheme- it's only a matter of changing the fabric. Easy peezy!

Tuesday, June 29, 2010

How to Make Hanging Bells to "Bell Train Your Dog"


It's summertime and my kids are bored. How do I know? Let's just say my 7 year old watched me cutting up strawberries and told me the way I was cutting them up was "fascinating" "seriously? fascinating?" I said. "Yes," he replied, "this is the most interesting thing I've done all day."

So of course I decided we'd better find a useful craft project...

Over the past couple of months several of my friends have adopted dog's and all of them have been talking about this bell training method. Jack doesn't bark to let us know he needs go out, he moves the wood shutters up and down to let us know he needs a potty break. Unfortunately, this doesn't bode well for for the one shutter he scratches to make his needs known. I thought the bells might be a better idea and set out to make some. Since I couldn't find any kind of tutorial I pretty much made this up with the help of the two little boys and a couple of easy to find craft supplies.

Supplies:
Ribbon (I used about 42")
Bells
Snaps (and snap attacher)
Split rings

I first measured down approximately 11" and then folded the end of the ribbon up 1/2" to hide the raw edge. Next, I folded the ribbon down approximately 5" to make a loop to hang over the door knob. I then secured the folded end with a pearl snap to secure the door loop. This will use your first 11" of ribbon. Next, I measured down approximately about 11 inches and created a snap loop to add my first set of bells. The bells consisted of a split ring attached to two bells to help give it more "jingle." Lastly, I hung the ribbon from the door and figured out about how long I needed to make it so Jack could ring it easily. Then I attached another set of snaps to make the loop on the end and attached the last set of bells so they could easily be rung.

Honestly, this is the hard way to do it. Trying to figure out which way each set of snaps needs to be attached so they're all facing the right way takes a little bit of thinking (not much, just a little). While this may add an additional 4 minutes that it takes to make this it is worth the time because the bells can be removed and the ribbon can be washed. The alternative to adding snaps would be to simply add the split ring and then stitch it closed.

Total cost was approximately $4 which included leftover split rings and two bells. Total time, about 12 minutes. The majority of the time was spent deciding on ribbon.

Here's a picture of Jack. He's very apprehensive of the bells (then again, he's afraid of rain, lightening, rabbits, other dogs...) Since he's a quick learner, especially with treats around, we hope it won't take long until he's using the bell instead of my shutters.

Sunday, June 27, 2010

Bedroom Bling

I love parties. I especially love the decor of parties. The puff balls hanging from the ceiling, crepe paper stringing from one wall to the next. It's just fun & happy. That's what I wanted my M's room to look like. She's just like me, all about the party! So I made this very simple banner to hang in her room. And when I say simple, I mean easy peazy! Here's what I did:
Step one. Fabric- I bought 4 different fabrics each 1/3 of a yard. This is enough to make 2 banners, but you need the length so 1/3 is the smallest I could buy for my banner to be the size I wanted. I made each triangle 12" wide at the top and 13" in length. After I had one cut out I layed it on top of the fabric and used my rotary cutter to cut the next one. I cut 3 triangles in each fabric, but only used 10 for my final banner.

I don't have a picture of this next step but I used grosgrain ribbon and sewed the triangles onto the grosgrain using matching hotpink thread. I think hot glue or fabric glue would work just as well though. I didn't back the fabric or anything. Unless its backlit by a window, it's not necessary. Here's my finished banner- and let me just say she loves it!
The cost of the project was $8.10 for 1.3 yards of fabric and 5yrds of grosgrain ribbon. It only took around 30 minutes to make & I can't wait to make more for my other two kids. I think this would be great for baby showers & birthday parties too. So easy & fun!

Monday, May 31, 2010

Magnet board collage- redo

Here is a picture that my husband and I mounted to masonite using spray mount, then we modge podged brush strokes on it to create a more canvas looking art piece. We found this picture at Z-Gallery for $425 and loved it- but not the price. So we found a place that sold the picture only for $80. Then my husband made the frame to go around it. It would've been far too expensive to pay someone to frame it for us- so he made a frame. I loved it! But then we moved to Texas where the humidity and modge podge didn't do so well together and you can tell in the corner of the picture that it started to bubble. I really didn't feel like I could find another picture to fit the frame- and I really didn't want to pay another $80! So- off to Home Depot where we found galvenized 10" ducting. Its far cheaper than the sheets of metal- it was only $13 for a large sheet of it. It looks like this.
We layed it flat and cut it with tin snips. (they look like giant scissors)

After it was cut to size we layed it on the masonite and used Weldwood, Contact Cement to adhere it. (Follow their instructions on can) We used a rolling pin to get any air bubbles out and then clamped it to the table overnight til it was dry.


Then we attached it to the frame and I began decorating magnets like crazy- including using my sister Renee's clothespin idea and attached a magnet to the back. Here is the finished product- I'm not sure I'm going to keep it over my fireplace- but I think it would be great in my office!


I'm linking to this awesome site!Visit thecsiproject.com

Sunday, May 30, 2010

Pillow tutorial for dummies like me

Ok- let me first tell you how ridiculous this is that I'm posting a sewing tutorial. I had a hot glue gun heating up next to me in case the sewing machine had any melt downs. I was prepared to hot glue these pillows together if necessary!


I just had my house painted this week, a lovely shade of gray. Classic silver, actually. I'm changing out all the red in my family room and going gray- with some hints of orange if I ever find some fun fabric! I have a bunch of pillows that need recovering now and I'm desperate to change them so I reluctantly pulled out my sewing machine. Its just not the same sewing experience when I'm without my mom. Usually, my mom hops on the machine and I pull up a chair and start unwrapping chocolates to pop in her mouth as she sews. (I don't want her to get chocolate fingers on the fabric after all. I'm so thoughtful, I know) I should be an incredibly gifted seamstress with all my mom's and mother in laws's help. But sadly no, I'm quite possibly the world's worst sewer. (Yes sew-ER is also how you spell sewer, as in, the place where I should throw all my fabric after I've tried sewing!)

So on to my pathetic attempt at sewing this pillow-

Step 1: Fold the fabric in half and cut the size you want, adding a half inch to each side for the seam. Don't cut the fold- it's one less straight line you have to sew & then rip out (if you're like me!)

Step 2: For the ruffles I cut six strips 2 inches wide and double the height of the pillow. Then sew them down the middle with the biggest stitch you can. Gently pull one of the threads at the end to start making it a ruffle. Pull carefully or it rips and its all over for you- and you may have to pull out the hot glue-

It should look like this after you pull the one thread.


Step 3: After you make the six ruffles I pinned them to the pillow wear I wanted them and stitched them down the middle.

Steo 4: Once the front was how I wanted it, I folded the fabric right side in and sewed the two sides together. I flipped it right side out and handstitched it closed! I love the end result but don't look hard- its not the prettiest stitches- The person who invented shabby chic must be a lame sewer like me! Flaws, what flaws? It's shabby chic!

Wednesday, May 26, 2010

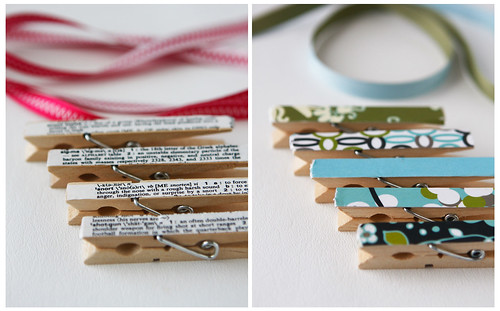
Fancy Clothespins


note clothespins, originally uploaded by Nestlings.

Re-purposed Clothespins

Andrea posted about our re-purposed cabinet doors with the wonderful chippy paint yesterday. Each one is truly one of kind and we all immediately fell in love with them. Well, almost all of us. My dad kept scratching his head saying “hmmm, I just don’t get it, but tell me where to attach the screws.” He was truly a good sport about it. Besides the chippy paint, what really set these cabinets off were the decorative clothespins. This was a very sweet and simple way to set off the photos and note cards that were being displayed and so simple to create.

My fourteen year old actually made the samples shown and the ones used on the cabinets at the show. Just like the Looking Sharp tutorial found here


Supplies:

Bits of paper {decorative scrapbook, the inside of envelopes, or an old dictionary}
Clothespins
Small/tiny paintbrush
Modge Podge

Directions:

1.Gather supplies

2.Measure your clothespins and cut paper to size

3.Brush Modge Podge on the back of the strip and attach to the clothespin

4. Let dry at least ½

5. Alternative step; add a light coating of antique to give each clothespin a vintage feel

6. Once it’s dry you’ll go back over the top of each piece of decorative paper to add a protective finish to each clip

There are many uses for the decorative clothespins even if you don’t have a vintage door. Kids’ artwork or photos can be hung with twine, add a strong magnet and hang notes from the fridge, or use to hold a gift tag on a bag. Please leave a comment and tell us how you would use decorative clothespins in your life and one lucky comment will win your choice of the green/blue or dictionary clothespins. This will end Sunday June 6th!

Tuesday, May 25, 2010

Junky to Funky!

So my mom got these great old cabinet doors from someone who was getting rid of them. Most people would look at them and junk them. But not us! We like to make junky a little funky! They already had this great crackle finish on it, so we didn't need to even paint! Sweet! We washed them up and attached screws to the sides and then wrapped picture wire around the screws and tightened them up to hold the wire in place. My sister Renee made these adorable clothespins (stay tuned for the tutorial!) and we attached pictures to them. I think it would be fabulous to hold children's artwork or even use it as a jewelry holder. There are so many possibilities! I can't wait to get my hand on some old doors now!

Sunday, April 18, 2010

Wall art


Have you ever finished a project but then can't decide whether you love it or hate it. Well, that's what I can't decide. Is it fun or just weird? It didn't take much time, the only thing really time consuming was hanging it. That took atleast 40 min to get it straight! Plus lots of fun extra holes in the wall to patch later. My sister (and MOM!) both have a vinyl lettering business. You can order from Renee here.

So I painted 2 -24" square boards black with craft paint. You can find them at Lowes or Home Depot for around $5. Then I used blue painters (easily removable) tape to mark where each line should be. Then I simply laid down the letters & peeled up the clear backing. Easy Peazy Lemon Squeazy! Since the boards are REALLY thin, you can't hang it with regular picture hangers. I had to find fabric picture hangers. You simply wet the fabric and attach and then let it dry over night. So what do you think? Should I keep it or not? If I do keep it, I may be singing this song everyday for the rest of my life! P.S- These walls are BAAAAORING, I know! I'm painting my walls soon and can't decide which color. Gray is in but this is my entrance, into my family room & staircase & game room. I'm not sure I want to comit to all gray. What color do you think I should paint the walls? Help me peeps, I'm having commitment issues!

Sunday, April 11, 2010

When I have grown a foot or two...Missionary tag


My friend Teri asked me to come up with a special sign for her son and nephews several months ago. Always willing to take on a new challenge, I was happy to oblige. Teri had a brilliant idea to create a missionary tag complete with the customized name. Along the bottom she wanted to add “When I have grown a foot or two…” lyrics from a children’s song our kids know quite well. Neither of us had seen it done but the picture in our head looked AMAZING.

So this is what I came up with.

The supplies were easy, I used a piece of wood that measured approximately 9.5” x 12” x 2” I liked the thicker width so it could stand on its own. The entire thing was then painted in 3 coats of my favorite black paint. As a sign-maker {I've been selling on etsy as Nestlings for over 5 years}, cutting the lettering is the easy part. I used a font called Serlio to make it look a little more authentic and more of childish font for the song lyric. For the do-it-yourselfer, I think a cricut would work but I've never used one so if it doesn't please don't hold it against me. Most of the time I’ll distress the edges, but this time I wanted it to really look like a missionary tag so I left it alone. Once the lettering was applied I sealed everything with a few coats of varnish and let it dry.

Almost makes me wish I were the CTR 8 teacher,I’d have gifts ready to go! {Kidding, that’s not a challenge I’m up for right now!}

I linked up to:
Photobucket

Show and Tell Green

Saturday, March 20, 2010

Easy Fabric Bucket Tutorial


This is my version of the easy fabric bucket that I came up with back when I had more time than money and needed some simple baskets for the kids or a way to wrap a gift for a friend. Even if you’ve never sewn before, trust me, you can tackle this with the simplest of ease and if you can’t…well back away from the sewing machine mama, there is simply no hope for you.

Both the inside and outside of the bucket are made the same, making this completely reversible. Once you’ve mastered the simple bucket you can spice it up with handles, appliqués, or even a quilted stripy pattern on one side.

Supplies:
Ruler
Rotary cutter
Mat
Regular sewing supplies
Canvas, duck cloth, denim, or any other heavy fabric. This will allow you to make the bucket stand without having to add any interfacing or batting.

First Step:
For the outside of the bucket you will need to cut 1= 10” x 22” strip of fabric and 1= 7” circle
For the inside of the bucket you will need to cut an identical set with the same measurements as above. I would recommend using two coordinating fabrics, and then if you fold the top down you’ll get a bit of flair showing.

Second Step:
Placing right sides together (along the 7” side), pin and sew (I use ¼” seams) the ends to make a tube. You’ll do the same with the other strip of fabric.

Third Step:
With the wrong side facing out, pin the circle to the bottom of the tube. To avoid frustration when it comes time to sew, make sure you spend the time pinning the base evenly around. Sew around the base using ¼” seams.

Do the same to the second tube and circle base.


Fourth Step:
Turn the outside of the bucket right side out and place inside of the outside of the bucket. Sounds confusing I know just look at the sample picture and make sure that both the inside and outside pieces have the right sides of the fabric facing each other.

Fifth Step:
Match up the raw edges at the top of the bucket and trim any unnecessary threads. Sew along the top with a 1/4” seam leaving an opening approximately 3-4” wide open (un-stitched). You’ll use this un-stitched section to pull the entire bucket through which will leave a nice finished seam at the top.

Sixth Step:
This is where an iron comes in really handy, carefully iron the seam at the top making sure the fabric is pulled as to not leave a large gap of fabric. This will help to make sure the top of your bucket is even all the way around. Lastly, you’ll sew the 3” opening shut and secure both fabrics together by stitching along the top edge. Again, a 1/4” or topstitch if you have the appropriate sewing foot works well.


Now fill and enjoy!

I’ve used these over the years to wrap gifts, hold odds and ends or placed on my children’s dressers in coordinating colors to hide their “treasures” that just don’t fit the theme of their room.

Now post a link, I'd love to see your version.


Wednesday, March 10, 2010

Origami box toot

I learned how to make these origami boxes back in the 4th grade. Who says you don't learn anything in school? I used to make them with black paper with puff paint gold stars and my mom would fill them with homemade chocolates for me to sell at my dad's work. He would just set them on his desk and bring home the cash. Pretty nice set up for a nine-year-old. I think they're a super cute way to present a gift- and now you can see how easy they are to make!
First you take a 12x12 piece of scrapbook paper.

Fold it in half diagonally.

Then fold it again.

Now, open it up again.

Now bring one corner to the very center where the folds meet. Do this to all four corners. Be very percise!


This is what it should look like now:)

Now, bring one side up and fold it on the fold.

Then bring your other side to meet it in the middle. (You may need a little help)

Next, open it up and fold both sides in again, only on the other side you haven't folded yet- does that make sense?

This is what it will look like- hopefully!

Next you'll need to cut carefully on the fold where I've shown. You only want to cut enough so that little triangle is apart, like I've shown here.

Now you'll need to make 3 more cuts, 2 cuts on each parallel side. Have you ever tried taking a picture of yourself cutting?! Yeah, it wasn't going to happen.

Next you'll fold the two sides up to build a little wall, and hold your hand there to keep it in place.

Using your other hand, you'll bring the flap OVER the wall you build and tuck the flap down into the bed of the box. Now do that on the other side too.

Now you have half of a box and you'll have to make another box- the same size- to have a complete set. To put the two sides together, you just have to wiggle and push it gently together.

Perfect place for a little gift- or to hide the easter eggs from Zac. He'd NEVER check inside that box. More starburst jellybeans for me!

Here's the completed box! That wasn't so bad, was it?

Disclaimer: Yes, I know I have ginormous hands.
I'm linking this up to today's creative blog get your craft on!