Sisters with Flair

Monday, May 31, 2010

Magnet board collage- redo

Here is a picture that my husband and I mounted to masonite using spray mount, then we modge podged brush strokes on it to create a more canvas looking art piece. We found this picture at Z-Gallery for $425 and loved it- but not the price. So we found a place that sold the picture only for $80. Then my husband made the frame to go around it. It would've been far too expensive to pay someone to frame it for us- so he made a frame. I loved it! But then we moved to Texas where the humidity and modge podge didn't do so well together and you can tell in the corner of the picture that it started to bubble. I really didn't feel like I could find another picture to fit the frame- and I really didn't want to pay another $80! So- off to Home Depot where we found galvenized 10" ducting. Its far cheaper than the sheets of metal- it was only $13 for a large sheet of it. It looks like this.
We layed it flat and cut it with tin snips. (they look like giant scissors)

After it was cut to size we layed it on the masonite and used Weldwood, Contact Cement to adhere it. (Follow their instructions on can) We used a rolling pin to get any air bubbles out and then clamped it to the table overnight til it was dry.


Then we attached it to the frame and I began decorating magnets like crazy- including using my sister Renee's clothespin idea and attached a magnet to the back. Here is the finished product- I'm not sure I'm going to keep it over my fireplace- but I think it would be great in my office!


I'm linking to this awesome site!Visit thecsiproject.com

Baby Boy Tie Giveaway Winner!


Congrats to Kendra Goodrich who said this:
"I sure hope I win, because I have two little boys who would look quite dashing in them! "

Kendra, just send your email address to me at ydnam07@gmail.com and we'll work on getting you your two ties!
Thanks everyone for all your comments- you're the greatest! Hope you're all enjoying your holiday! Finally the hubby has a day off! We're going to go take advantage of it!
Catch ya later!!

Sunday, May 30, 2010

Pillow tutorial for dummies like me

Ok- let me first tell you how ridiculous this is that I'm posting a sewing tutorial. I had a hot glue gun heating up next to me in case the sewing machine had any melt downs. I was prepared to hot glue these pillows together if necessary!


I just had my house painted this week, a lovely shade of gray. Classic silver, actually. I'm changing out all the red in my family room and going gray- with some hints of orange if I ever find some fun fabric! I have a bunch of pillows that need recovering now and I'm desperate to change them so I reluctantly pulled out my sewing machine. Its just not the same sewing experience when I'm without my mom. Usually, my mom hops on the machine and I pull up a chair and start unwrapping chocolates to pop in her mouth as she sews. (I don't want her to get chocolate fingers on the fabric after all. I'm so thoughtful, I know) I should be an incredibly gifted seamstress with all my mom's and mother in laws's help. But sadly no, I'm quite possibly the world's worst sewer. (Yes sew-ER is also how you spell sewer, as in, the place where I should throw all my fabric after I've tried sewing!)

So on to my pathetic attempt at sewing this pillow-

Step 1: Fold the fabric in half and cut the size you want, adding a half inch to each side for the seam. Don't cut the fold- it's one less straight line you have to sew & then rip out (if you're like me!)

Step 2: For the ruffles I cut six strips 2 inches wide and double the height of the pillow. Then sew them down the middle with the biggest stitch you can. Gently pull one of the threads at the end to start making it a ruffle. Pull carefully or it rips and its all over for you- and you may have to pull out the hot glue-

It should look like this after you pull the one thread.


Step 3: After you make the six ruffles I pinned them to the pillow wear I wanted them and stitched them down the middle.

Steo 4: Once the front was how I wanted it, I folded the fabric right side in and sewed the two sides together. I flipped it right side out and handstitched it closed! I love the end result but don't look hard- its not the prettiest stitches- The person who invented shabby chic must be a lame sewer like me! Flaws, what flaws? It's shabby chic!

Friday, May 28, 2010

Summer Reading Lists!


Memorial Day is almost upon us and you all know what that means right? The start of summer reading! What waterlogged books will be found at the bottom of your pool bag this summer?

As the school year came a couple of weeks ago I began making a list and gathering the books I wanted to read this summer. With little “fun” reading the past few months, I’ve already made it through several of my “can’t wait to read books” including The Help, The Guernsey Literary and Potato Peel Society Club, Eats Shoots and Leaves, and La Lacunda. My list is quickly dwindling away.

A couple of days ago I was talking to a friend. Rumor had it she had set a goal to read 100 books this year {oops, I first thought it was 200, yikes!!}. She turned me onto this awesome website called Goodreads. Within 20 minutes I’d found and rated almost 200 books that I’d previously read. By rating books and finding others with similar interests you can find new books to add to your list or keep track of books you want to read in the future. Over the years I’ve tried to keep track of which books I’ve read but since I have a habit of throwing things away I always manage to “lose” my list. Those days are over, now it’s easy I just log into my account. Goodreads even gives you the option of linking your account to facebook so you can share your favorite books or current reads with your friends.

Don’t keep your summer list a secret, what great books will you be reading this summer???

Thursday, May 27, 2010

Lee won! (and felt board stories)

First of all, I have to say HOORAY for my man, Lee!!! I'm so proud of him, I kind of feel like I know him because he reminds me a lot of my brother, Tony, who's also trying to get into the music biz. My countless weeks of voting for him have paid off! I just love his voice, I think he's amazing singer!

Alrighty, thanks for letting me get that off my chest. It was just a very exciting finale for me!
So, I'm really excited about my latest project. I've been looking for ways that I can teach my toddler bible stories (I guess I'm also planning for when he's a little older). I found this blog where this girl, Sarah, shows how she makes felt board stories. You just go to this other blog where fellow blogger, "Cocoa" was nice enough to have all these flannel board stories ready to print off. Then, instead of just printing on regular paper or cardstock, you print on iron-on transfer paper and then iron that onto felt. Genius! My little guy can actually play with the felt board instead of me worrying that he'll ruin the paper pieces. Sarah also showed how she made manila folder pockets for each story to contain all the felt pieces and the scriptures or story that goes along with it. There are tons of stories, so far I've got 12 done. It makes it so easy to have a Family Home Evening lesson that is ready to go! Go check out this blog!


Christ's Birth


The Creation


To create the felt board, I just covered a piece of wood with a large piece of felt and duct taped it on. A little ghetto, but quick and easy!

Wednesday, May 26, 2010

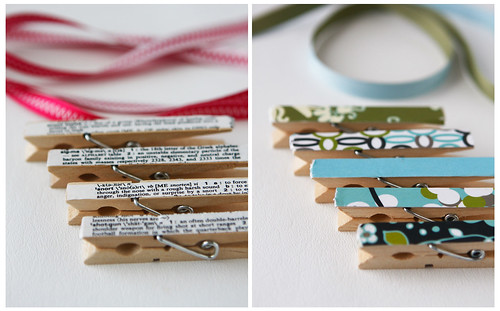
Fancy Clothespins


note clothespins, originally uploaded by Nestlings.

Re-purposed Clothespins

Andrea posted about our re-purposed cabinet doors with the wonderful chippy paint yesterday. Each one is truly one of kind and we all immediately fell in love with them. Well, almost all of us. My dad kept scratching his head saying “hmmm, I just don’t get it, but tell me where to attach the screws.” He was truly a good sport about it. Besides the chippy paint, what really set these cabinets off were the decorative clothespins. This was a very sweet and simple way to set off the photos and note cards that were being displayed and so simple to create.

My fourteen year old actually made the samples shown and the ones used on the cabinets at the show. Just like the Looking Sharp tutorial found here


Supplies:

Bits of paper {decorative scrapbook, the inside of envelopes, or an old dictionary}
Clothespins
Small/tiny paintbrush
Modge Podge

Directions:

1.Gather supplies

2.Measure your clothespins and cut paper to size

3.Brush Modge Podge on the back of the strip and attach to the clothespin

4. Let dry at least ½

5. Alternative step; add a light coating of antique to give each clothespin a vintage feel

6. Once it’s dry you’ll go back over the top of each piece of decorative paper to add a protective finish to each clip

There are many uses for the decorative clothespins even if you don’t have a vintage door. Kids’ artwork or photos can be hung with twine, add a strong magnet and hang notes from the fridge, or use to hold a gift tag on a bag. Please leave a comment and tell us how you would use decorative clothespins in your life and one lucky comment will win your choice of the green/blue or dictionary clothespins. This will end Sunday June 6th!

Tuesday, May 25, 2010

Junky to Funky!

So my mom got these great old cabinet doors from someone who was getting rid of them. Most people would look at them and junk them. But not us! We like to make junky a little funky! They already had this great crackle finish on it, so we didn't need to even paint! Sweet! We washed them up and attached screws to the sides and then wrapped picture wire around the screws and tightened them up to hold the wire in place. My sister Renee made these adorable clothespins (stay tuned for the tutorial!) and we attached pictures to them. I think it would be fabulous to hold children's artwork or even use it as a jewelry holder. There are so many possibilities! I can't wait to get my hand on some old doors now!

Monday, May 24, 2010

Tutorial: Princess Cape

A few years ago, my teaching mentor showed me how to make these capes, so I made one for my niece's birthday. The cape has been a big hit at their house ever since as they use it to celebrate birthdays and other special days. A friend's little girl recently had a birthday, so I used the opportunity to make another! It is really quite easy, and if you can sew a half-straight line, you can sew this!
Here's what you'll need:
2 yards of princess-y fabric (one yard for each side)
1 package of single fold bias tape
sewing machine

Here's what the finished cape looks like. I would've had my little man model for you, but he was napping:)
Take each 1 yard piece of fabric and put right sides together, then pin in place. Sew all around the edge, leaving a gap so you'll be able to turn it right side out. Watch to make sure you sew the selvages so they won't show on your final product.
Clip all the corners, then use that gap you left to turn the entire cape right side out. Iron down and then sew all the way around with a 1/4" seam allowance. Make sure you sew that gap down!
Here's what it looks like after you've sewn it all down. A big piece of double-sided nothingness.
Now you'll make some pleats- I just eye-balled it to make sure they're somewhat even on both sides. You'll also want to check your fabric to make sure your fabric is going the right way. If not, you might have some upside-down princesses.:P
Then I pinned those pleats into place.
Then sewed it down about 5 inches from the top of the cape.
Here's where you need that bias tape. You need to just lay it out over the pleats you just sewed down and leave room on both sides to tie a bow. I cut two lengths of that.
Then I just pinned into place over my previous seam.
This part's a little tricky. I then took the other piece of bias tape, and using the same pins from before, pinned it down onto the other side of the cape. So I'm covering the same seam on both sides. Make sense? You're kind of making a cape sandwich with the bias tape.
It's a tiny bit tricky, but you'll then do a fairly large zig-zag stitch to hold that cape sandwich into place. This way you'll only have to sew that bias tape down one time. I also used the zig-zag stitch to hold the bias tape together on both straps.
Voila! You're finished. It's really such an easy project and it is sure to get a lot of use!
Here's the back view. Not the fabric I would choose if it were for me, but this little girl is going to love it!

Total cost:

2 yards of fabric $8.88 (Wal Mart)

1 package bias tape $1.44 (Wal mart)

Total cost: $10. 32

Sunday, May 23, 2010

Shortbread aka: The Jean Shrinker


Every spring I slip on some capri's and think, "Dang dryer! You shrunk my jeans again!" Well it's confession day. I'm going to admit, this shortbread has a special place in my heart & apparently in my waist too! Every Christmas my hubs makes his family's Scottish shortbread recipe and sometimes I'm nice enough to share. Sometimes I'm not! If you like shortbread, you'll LOVE this recipe. If you don't like shortbread- GOOD! More for me! WARNING: This recipe is for the patient bakers. I've got the patience of a 2 year old when I'm in the kitchen, so like most of my baked goods- I leave it to my hubs to perfect. Don't blame me when your pants don't fit after this!
Grandma's Scottish Shortbread:
-1 1/2 C cornstarch - 4 1/2 C Flour -3/4 C powdered sugar
-3/4 C sugar -1 1/2 lb butter -Raw sugar or sanding sugar for the top

Preheat oven to 300 degrees. Sift together cornstarch and flour. Cream butter and sugars and blend into the sifted mixture. Press into a 12x16 cookie sheet and bake for 1 hour until barely light brown. Immediately cut into pieces while hot but don't remove from pan! Then add sanding sugar to the top for looks and let it cool in cookie sheet. Don't remove until completely cool. Freezes well too, not that I ever have any left over!

Hope you enjoy this as much as I do!

Thursday, May 20, 2010

Rainy Day Blues

I'm not a huge fan of rainy, windy days over here. It drives me bonkers to not go outside- let me rephrase that- it drives my little Z bonkers to not go outside. He wants to go play with the dog (did I mention we just got a dog- yikes). So for days like this, my favorite diversion is good old finger paint. My little man is not quite ready to having a pile of paint and put it on the paper himself yet, so I help him out and squirt it on myself. We talk a lot about the colors while we're doing it, but so far he's only saying "boo." And have you gotten yourself some of these smocks from IKEA? I think they were $5 for 2. Awesome. And they wash up easy peasy.

Mom's attempt at containing the mess

Loving it!

Our finished products! BTW, I totally recommend this crayola washable fingerpaint because it really washes off so easy and we haven't had it stain anything yet. Even the red washes off skin pretty well.

Super-power Wish


Lately, time seems to be flying whether I’m having fun or not. My To Do list only seems to grow longer everyday and I’m sure many of you feel the same. That started me thinking, what could I do to accomplish more in a day.

Nearly two years I was at a woman’s activity that involved a getting to know you game. A basket of random questions was passed around and our friend Andrea, who always looks amazing, grabbed the question “If you were a super-hero, what magic power would you want to possess?” Without hesitating, Andrea said she’d want to be able to just blink her eyes and she’d be ready for the day. Frankly, I thought she might be a little crazy, I could think of tons of super-powers I’d want to have. The more I’ve thought about it (and obviously I’ve thought about it over the years) I realize Andrea really was onto something. Literally she’s saved hundreds of wasted hours a year.

So now I’ve decided if I ever get a chance to choose one super-power I’m totally copying Andrea’s idea. In the meantime I’ll just keep adding to my never-ending To Do list.

Tuesday, May 18, 2010

52 Weeks Challenge


Remember when I started my 52 weeks of Photos challenge here? Well, easier said than done! I think this is my first photo attempt with my family. Its difficult to be in photos, I feel best when I'm behind the camera. Then I remembered, black & white is your friend! Photos of my family are so important so I've had to challenge myself to actually BE IN THEM! My little M took these of my hubs and me. Not completely perfect but it's what I love about them. So for this next weeks challenge: Video tape your kids. Ask them a series of questions about when they are older. What do you want to be when you grow up? How many kids do you want to have? What will their names be? Who's funnier, Dad or Mom? I love listening to their answers! What little video I have of my kids, we cherish. And we laugh- watching home videos is our favorite Sunday activity. Ok, it's tied with naps & dessert! So are you up for the challenge? Get chargin' those video cameras, you're in for some laughs! Oh, and maybe YOU should be in it as well!

Monday, May 17, 2010

Dessert for Dinner


I am not exaggerating in the least when I tell you that we grew up eating dessert EVERY night. Mom would send us off to school and then make the dessert for that night. Occasionally, my brother Eric, "the crepe expert," would make these for dinner. We never stuff our crepes with anything but sweetened sour cream and strawberries. I was nervous to make these the first time, but I actually am better at making these than pancakes, (I burn pancakes too much!)I made these for dinner last night because I figure it really is a balanced meal- carbs, fat, protein (2 eggs), and a fruit. Here's the recipe I use from "Cuisine at Home."
Basic Crepes
2 eggs
1 1/4 cup milk
1 cup all-purpose flour
2 Tablespoon vegetable oil
1/4 teaspoon kosher salt
Combine all the ingredients together in a large bowl using a hand mixer on low. Scrape the sides down and then mix for about 10 seconds, until the batter is really smooth. You'll need to let it chill for at least an hour and up to 24 hours.
Next, heat a 10 inch nonstick pan on medium heat. I take a silicone baster and rub a little butter on the pan in between each crepe. Use a 1/4 cup measuring cup and pour it into the hot pan. You need to immediately swirl the pan around to cover the entire base of the pan. It'll take about 1 minute to cook each side, just flip with a spatula. Just continue to cook them until the batter's gone- it goes by pretty fast. You can make these ahead of time and put them in the fridge- wrapped up of course, I think they last about a week. They'll taste just as good!
I just add a little powdered sugar to the sour cream and strawberries to sweeten. So good, and I always feel just a little bit fancy after I make these:)

Sunday, May 16, 2010

Mason Jar Chandelier


Have you ever been in the middle of a long, exhausting project and want to torch it before you even finish it? But you've already invested too much time and money into it that you can't! Yeah, that's how my hubs feels after this torturous project. He is the most patient man I have ever known, but I'm afraid this 21 mason jar chandyleer project about broke him! I saw this light fixture in an Anthropologie store (not for sale) and thought, we could make that! How easy is that? I am often upset when I see light fixtures at the store and their enormous price tags. They seem so over priced! I started off intending to do an entire tutorial on this project complete with pictures. But after 4 Home Depot trips, one trip to the grocery store for the jars, 20 hours of soldering & wiring & drilling and then 3 hours of installing, uninstalling and then re-installing the Darn thing. Do yourself (& your hubs) a favor and just buy a dang light fixture! No matter the cost! Because, you can't get back the week you just wasted on this "useless" project. I say useless because that's the word my husband keeps repeating in his sleep for the last 2 nights after working on this. "psssh, psssh, USELESS! USELESS!" That's what I hear all night! The installation was worse than making it. Apparantly shoving 21 wires into a tiny hole isn't that easy! Honestly, as he was installing it for the second time, I was trying to figure out a way to torch the thing so I didn't have to look at it. But after all his hard work, I really didn't want to tell him how ridiculous it looks. Some projects just look better in my mind I guess. I probably should've listened to my friends when I told them about making a mason jar chandelier. Their responses were "hmmm, interesting." Which if I read between the lines would've sounded more like "that sounds hideous Andrea- can't wait to see/make fun of it!" It's starting to grow on me a little more today, but I think that's because I realize I'm stuck with it for awhile. There's NO WAY I'm bugging my hubs for a new project (for at least a week:)! Atleast until this one stops haunting his dreams! I think this would look better if it were over the kitchen table instead of the living room. What do you think? You can be honest. I can take it. In fact, the next time I get an idea that's crazy, could you save me (& my hubs) some time and just tell me I'm insane? Thanks, that would be fabulous.

I'm linking to this great site! Visit thecsiproject.com
href="http://todayscreativeblog.blogspot.com/" target="_blank">BCD

Thursday, May 13, 2010

My Cleaning Schedule

Warning: This post may be a little boring, but might help you relieve stress!
Back in the good old days of living in our apartment, kid-free, cleaning was easy and fast. I could have the whole apartment- all 700 square feet done and clean in a couple hours. Fast forward a couple years to a house with triple the space and a crazy toddler who destroys as fast as I can clean and things aren't as pristine as they used to be. But I will not give up! I took a clean and organization class from this lady who showed us how to do everything fast and keep up on the house, but the most important piece of information that I took away from that class is when she told us that we need to have a "day" where we schedule to do that certain chore. It's so overwhelming to think of cleaning the entire house in one day with a toddler underfoot, but now I just do my minimum chore for the day (and if I'm feeling especially motivated, I'll do some extra). Things are able to stay managably clean and the house never gets crazy full of dirt. Best of all, keeping on a schedule helps me feel like I accomplished something that day, even if all the toys have been hauled into the living room. Ok, here's the schedule that I use- just tweak it to make it work for you!
My Cleaning Schedule
Monday- Clean bathrooms (tubs, toilets, sinks, mirros, floors)
Tuesday- dust furniture, clean wood floors, water plants
Wednesday- vacuum upstairs and down, change bedsheets and wash them
Thursday- weed garden/ organize/ grocery shopping (whatever needs to be done most)
Friday- get started on laundry
Saturday- finish laundry, fold, put away (I do this Saturday so Zac can fold it:)
Of course we have a constant battle with the clutter, but hubby and I do a 5 minute pickup after we put the little one to bed so I can relax for the night.
Hope this helps some of you!

Tuesday, May 11, 2010

Sisters


Well- after a week together we managed to snap a few photos of us 3 girls together. A photo of us all together is very rare! And we even managed to get a picture with the craft genius herself..... OUR MOM! Thanks to our talented SIL who is a really great photographer. If you're in Wenatchee, Washington you should hire her. Here's her link. So here we are. A couple of crazy girls who want to craft, laugh and eat chocolate together. What more can you ask for in life?

Sunday, May 9, 2010

Book Review: Three Weeks with my Brother


Alright, raise your hand if you watched the Amazing Race finale last night. Ok, now raise your hand if you were happy with the result. Don't worry, I won't pull a spoiler-alert on you here, but watching Amazing Race usually perks me up and leaves me dreaming of spending 3 weeks with my sisters. Wouldn't that be SOOO incredible to do that?! With all expenses paid?!!! Sweet. But until we can all convince the Amazing Race people to accept us on the show, we'll have to settle for this book. Ok, be warned, this IS a Nicholas Sparks book, but before you go on about how sappy and alike all of his books are, you need to know that this one is totally DIFFERENT! It's sort of a autobiography thrown into a nice, easy to read novel. Nicholas Sparks and his brother go on this "amazing" tour around the world in 3 weeks and learn so much about themselves and the world around them along the way. I'm totally ready to pack my bags and make this trek around the world with my sista's. Maybe next May, Andrea? Enjoy the read!